
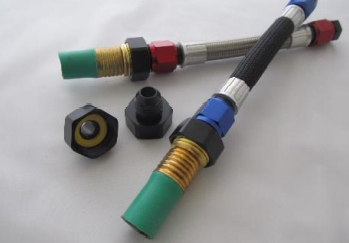
Hose Cutting and Assembly
Series 3000 Hose Cutting & Assembly
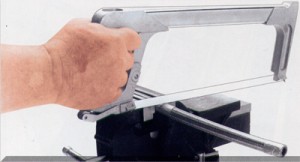 |
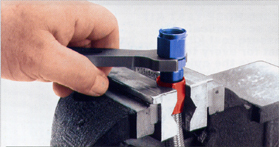
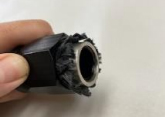
Cutting the Fragola Performance Systems Series 3000 stainless braided hose is easy. Wrap the hose with “Gray” or masking tape at the length desired. Hose may be cut with a hack saw, if you have a 32-teeth-per-inch blade, otherwise a Beverly Shear, radiac, or chop saw will work fine. You want to keep the braids from fraying. After the cut, carefully remove the tape and trim from the frayed ends if necessary. | |
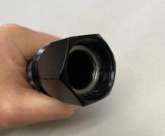
| Using FPS aluminum vice jaws will help protect the hose from scratching during the next steps. If there is a concern about scratching, the hose end may be wrapped with tape for protection. Place the red socket in a vise, and insert the hose through the smooth end until the hose lines up with the bottom of the threads inside the socket. | ||
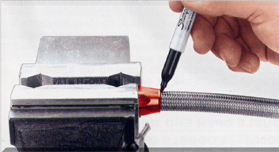 |
It is important to mark the outside of the hose at the end of the socket. This will show you if the hose has “pushed out” of the socket during assembly, and if so, will leak when used. | |
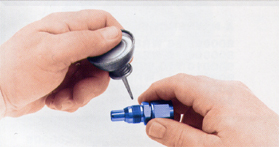 |
It is very important to lubricate the inside of the hose/socket assembly, and the outside of the cutter threads with any assembly lube, anti-seize compound, or 30 wt. Motor Oil. W/D-40 is not recommended! | |
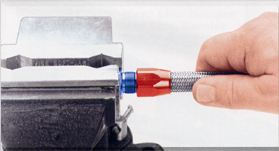 |
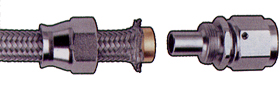
Hold the hose and not the socket, start the hose on the nipple of the hose end, with a gentle motion. Continue pushing on the hose until the threads can be engaged. Some sizes may require the use of some force to engage the threads at this point. | |
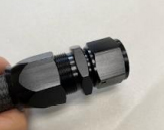
| It doesn’t matter which portion (the socket or the nipple) is secure in the vise. Using a suitable wrench tighten the socket threads onto the cutter. An adjustable “Crescent” type wrench is not recommended, as it may slip and damage the outside of the hose end. | ||
 |
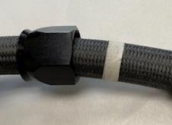
Tighten until the socket is within .060-.080″ of bottoming out. Recheck your mark, and if it is within 1/16″ of the socket your are OK. If not, disassemble the hose end, re-cut the hose and start all over again. | |
| Clean the inside of the hose assembly with the clean solvent. Blow out residue with a compressed air. It is strongly recommended that you test the hose assembly for leakage before putting it into service. Be sure to lubricate the “B-nut” threads before installing on an adapter. |
P.T.F.E. Hose Assembly
 |
You may cut the hose in the same method as our 3000 series hose, or use a thin cutoff wheel on a die grinder. | |
| With the hose cut to the desired length, you must first slide the “socket” onto the hose. | ||
| Next you must open up the braiding in order for the “olive” to slide over the PTFE liner. Our #900065 PTFE Braid Spreader works well in this application. The braid must be spread sufficiently so that small shoulder inside the “olive” rests against the cut end of the PTFE liner. | ||
| If you used our #900065 Braid Spreader, the nipple end will have already resized the PTFE liner, which may be squashed from the cutting operation. If not, you must insert something in the end of the PTFE liner to bring it back to a round shape (an ice pick works well for this operation) | ||
| Please Note when assembling Black or Clear Covered PTFE Hose, it’s necessary to strip a 1/4″-3/8″ of the cover off in order to spread the braid out and install the “olive”. |
P.T.F.E. Hose Assembly
|
You may cut the hose in the same method as our 3000 series hose, or use a thin cutoff wheel on a die grinder. | |
| With the hose cut to the desired length, you must first slide the “socket” onto the hose. | ||
| Next you must open up the braiding in order for the “olive” to slide over the PTFE liner. Our #900065 PTFE Braid Spreader works well in this application. The braid must be spread sufficiently so that small shoulder inside the “olive” rests against the cut end of the PTFE liner. | ||
| If you used our #900065 Braid Spreader, the nipple end will have already resized the PTFE liner, which may be squashed from the cutting operation. If not, you must insert something in the end of the PTFE liner to bring it back to a round shape (an ice pick works well for this operation) | ||
| Please Note when assembling Black or Clear Covered PTFE Hose, it’s necessary to strip a 1/4″-3/8″ of the cover off in order to spread the braid out and install the “olive”. |
Power Steering Hose Assembly
| You may cut the hose in the same manner as our Series 3000 Race Hose, but it is not necessary to tape the end prior to cutting. | ||
| Install the “socket” over the cut end of the hose. Some twisting may be required to get the “socket” to the desired position with the hose seated against the bottom of the socket. | ||
| Clamp the hose and socket in a vise using our #900061 Vice Jaws. Oil the tapered nipple with some form of motor oil/assembly lube, and screw the fitting all of the way in, until the socket seats on the fitting shoulder. Blow out with compressed air to remove any assembly residue. |
Race-Rite Reusable P.T.F.E. Hose End Assembly
 |
Begin by taping the hose off with 1-1/2 rounds of masking tape & cutting it to the proper length using a razor blade. Note: Race-Rite Pro Hose features a single braid of stainless wire wrapped around the convoluted PTFE Tube. Use a pair of tin snips to clip through the stainless wire. | |
 |
Place the socket over the hose and slide it back approx. 4”. | |
 |
Next remove the masking tape and place it back over the hose 3” from where it was originally located. This will keep the braid from fraying during the assembly process. | |
 |
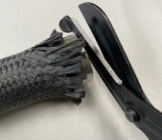
Pull the Aramid Braid away from the PTFE tube and install the aluminum “olive”. The tube will stop just short of being able to pass all the way through the olive. Trim any excess braid that sticks up past the olive using a pair of scissors. Note: Race-Rite Pro Hose users- will need to cut 1.5” of the stainless wire away before installing the olive. | |
 |
Apply a light coat of oil or dab of anti-seize to the male threads of the hose end. | |
 |
Finish assembly by pushing the socket up over the aramid braid and olive. Then Insert the hose end into the socket, threading the two halves together. Tighten the socket until there is a .080”-.100” gap from bottoming out. | |
 |
At this point we recommend flushing the inside of the hose assembly out with water and blowing out any residue before putting the hose into service. See our P/N 900555BL, 900556BL, & 900557BL, Hose Flush and Pressure test kits for details. | |
© Copyright 2020 Fragola Perfomance Systems Inc. All Rights Reserved.
